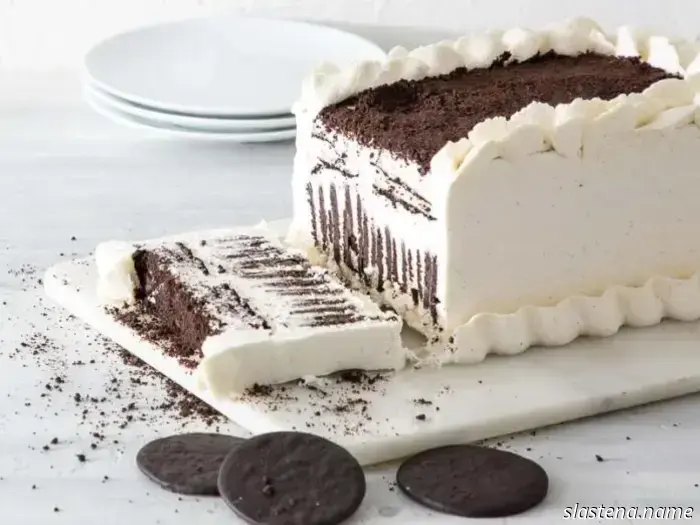
Chocolate Wafer Icebox Cake - Recipe from Scratch
For many, this icebox cake evokes an immediate sense of summer nostalgia. It’s cool, creamy, and packed with cookies, making it incredibly easy to prepare. While you can choose to enhance it, the classic Famous Icebox Cake—also referred to as the Famous Refrigerator Roll—was originally made with just wafer cookies layered between lightly sweetened vanilla whipped cream or whipped topping, then left to chill in the icebox, now known as the refrigerator. When stored in the icebox overnight, the cream's moisture and fat would permeate the cookies, softening them to a cake-like texture. This dessert became the quintessential summer treat for busy housewives, requiring no baking time and designed for preparation the night before.
Although variations of icebox cake predated Nabisco's Famous Chocolate Wafers, it was the company's recipe printed on the back of the box that popularized the dessert nationwide. The wafer cookies were introduced in 1924 by the National Biscuit Company, which would later rebrand as Nabisco. The initial packaging included chocolate wafers alongside ginger and sugar wafers, but due to high demand, the other flavors were eventually discontinued. In the 1940s, Nabisco's Famous Chocolate Wafers began to be sold in distinct cardboard packaging, and the icebox cake recipe was added to the label. The rest, as they say, is history. The lasting appeal of this uncomplicated dessert demonstrates that sometimes, the simplest ingredients yield the most delightful treats.
**Makes 1 (9x5-inch) Cake**
Light and airy vanilla-flavored whipped cream combines with rich layers of homemade Chocolate Wafers to create this summer delight. Once assembled, this cake competes with traditional chocolate cakes in both taste and visual appeal.
**Ingredients:**
- 3 tablespoons (45 grams) cold water
- 2¼ teaspoons (6 grams) unflavored gelatin
- 4½ cups (1,080 grams) cold heavy whipping cream
- 2¼ cups (270 grams) confectioners’ sugar
- 1½ tablespoons (27 grams) vanilla bean paste
- ½ teaspoon (1.5 grams) kosher salt
- Chocolate Wafers (recipe follows)
**Instructions:**
1. Line a 9x5-inch loaf pan with parchment paper, allowing the excess to hang over the sides.
2. In a microwave-safe measuring cup, combine 3 tablespoons (45 grams) of cold water with the gelatin, spreading it evenly on top. Let it sit to hydrate for 5 to 10 minutes.
3. Meanwhile, in the bowl of a stand mixer fitted with a whisk attachment, beat the cold cream on low speed. Gradually add the confectioners’ sugar, vanilla bean paste, and salt, beating until well blended. Increase the mixer speed to medium-low and continue beating until the mixture starts to thicken.
4. Heat the hydrated gelatin in the microwave on high in 5-second intervals, stirring in between, until fully dissolved and warm (do not heat to boiling).
5. Gradually mix 2 tablespoons of the cream mixture into the warm gelatin until combined. With the mixer set to medium-low, slowly add the gelatin mixture to the cream in the bowl in a thin, consistent stream. Increase the mixer speed to medium and continue beating until stiff peaks form. Set aside 2 cups (about 250 grams) of whipped cream in a small bowl. Cover and refrigerate until needed.
6. Spread a thin layer of the remaining whipped cream at the bottom of the prepared pan. Arrange 6 to 8 Chocolate Wafers in a single layer over the whipped cream, breaking and overlapping wafers as necessary. Follow with another thin layer of whipped cream and another layer of 6 to 8 wafers. Continue adding whipped cream until the pan reaches about three-quarters full. Gently tap the pan on a kitchen towel-lined counter to settle the whipped cream.
7. Insert 4 rows of 10 Chocolate Wafers vertically into the whipped cream, overlapping the rows if needed, and avoiding contact with the sides of the pan. Fill a pastry bag with the remaining whipped cream and cut a ¼-inch opening in the tip. Pipe whipped cream on top and between the wafers to completely cover them, smoothing it out into an even layer. (It’s fine for the cream to slightly exceed the top of the pan or for some cookies to peek through.) Cover and refrigerate for a minimum of 8 hours or up to overnight. (Add any leftover whipped cream in the pastry bag to the reserved 2 cups in the refrigerator.)
8. To serve, gently stir the reserved whipped cream until soft. Invert the cake onto a serving platter; remove the parchment paper. Use an offset spatula to smooth the top and sides, adding more whipped cream as necessary to cover any exposed wafers.
9. Place the
Other articles
 Caribbean Black Loaves - Bake from Scratch
Caution: This cake is strong. Resembling the molasses-heavy British pudding, black cake is a heavy loaf cake packed with rum-soaked dried fruit. Typically enjoyed during holidays or weddings in the Caribbean, this cake derives its rich flavor from dark molasses and dark rum, with its pronounced alcoholic hints coming from a substantial addition of
Caribbean Black Loaves - Bake from Scratch
Caution: This cake is strong. Resembling the molasses-heavy British pudding, black cake is a heavy loaf cake packed with rum-soaked dried fruit. Typically enjoyed during holidays or weddings in the Caribbean, this cake derives its rich flavor from dark molasses and dark rum, with its pronounced alcoholic hints coming from a substantial addition of
 Nectarine Turnovers - Bake from Scratch
The innate sweetness of nectarines is present in these pastries, complemented by a hint of vanilla and a sprinkle of sugar to elevate their taste.
Nectarine Turnovers - Bake from Scratch
The innate sweetness of nectarines is present in these pastries, complemented by a hint of vanilla and a sprinkle of sugar to elevate their taste.
 Ingredients are Crucial - Bake from Scratch
I was deeply hurt many years ago when my late husband, Elliott, a doctor and thus a scientist, referred to me as an alchemist. I perceived it as a slight because, for me, an alchemist was someone who turned hay into gold. While that wasn’t necessarily negative, it wasn’t my objective; my aim was to develop something infallible.
Ingredients are Crucial - Bake from Scratch
I was deeply hurt many years ago when my late husband, Elliott, a doctor and thus a scientist, referred to me as an alchemist. I perceived it as a slight because, for me, an alchemist was someone who turned hay into gold. While that wasn’t necessarily negative, it wasn’t my objective; my aim was to develop something infallible.
 Icebox Pies and Cakes for Summer - Bake from Scratch
As temperatures rise, few things are as satisfying as a cool, creamy dessert. These icebox pies and cakes are the perfect solution for beating the heat.
A Victory Wimbledon Brunch - Bake from Scratch
Whether you're watching the tennis or simply enjoying the scones and strawberries, the Wimbledon season offers a great opportunity to host a brunch.
Icebox Pies and Cakes for Summer - Bake from Scratch
As temperatures rise, few things are as satisfying as a cool, creamy dessert. These icebox pies and cakes are the perfect solution for beating the heat.
A Victory Wimbledon Brunch - Bake from Scratch
Whether you're watching the tennis or simply enjoying the scones and strawberries, the Wimbledon season offers a great opportunity to host a brunch.
 Nectarine Cobbler - Bake from Scratch
The soft, biscuit-like topping absorbs all the fruity syrup in this quick and simple Nectarine Cobbler.
Nectarine Cobbler - Bake from Scratch
The soft, biscuit-like topping absorbs all the fruity syrup in this quick and simple Nectarine Cobbler.
Chocolate Wafer Icebox Cake - Recipe from Scratch
Vanilla-scented whipped cream is combined with homemade Chocolate Wafers to form this Chocolate Wafer Icebox Cake.